QLocalSocket+QEventLoopを組み合わせた時のreadyReadシグナルの仕様
QLocalSocketとQEventLoopを組み合わせると、非同期なネットワーク呼び出しを同期的に記述できます。(もちろんUIスレッドはブロックしません)。
詳細はここの”Forcing event dispatching”という箇所を参考にして下さい。
http://qt-project.org/wiki/Threads_Events_QObjects
基本的な流れとしてはQLocalSocketにデータを何かwriteした後ローカルのQEventLoopを呼び出し(exec()というメソッド)、readyReadシグナルが届いたらイベントループを終了(quit()メソッド)させるという流れです。
しかしここで大きな落とし穴があり、readyReadシグナルが呼ばれた中で再びイベントループを呼び出すと、readyReadシグナルはそのイベントループでは呼び出されません。Qtのドキュメントにもそのように書かれています。(僕はこの仕様でかなりはまりました^^;)
http://doc.qt.io/qt-5/qiodevice.html#readyRead
readyRead() is not emitted recursively; if you reenter the event loop or call waitForReadyRead() inside a slot connected to the readyRead() signal, the signal will not be reemitted (although waitForReadyRead() may still return true).
実際のソースコードの該当箇所を見てみると以下のようになっています。
qabstractsocket.cpp
// only emit readyRead() when not recursing, and only if there is data available
bool hasData = newBytes > 0
#ifndef QT_NO_UDPSOCKET
    || (!isBuffered && socketType != QAbstractSocket::TcpSocket && socketEngine && socketEngine->hasPendingDatagrams())
#endif
    || (!isBuffered && socketType == QAbstractSocket::TcpSocket && socketEngine)
    ;

if (!emittedReadyRead && hasData) {
    QScopedValueRollback r(emittedReadyRead);
    emittedReadyRead = true;
    emit q->readyRead();
}
readyReadシグナルにDirectConnectionを使ってconnectされたスロットが呼び出され(この時emittedReadyRead == trueとなる)、その中でイベントループが作られ再度上記の箇所に到達した場合、emittedReadyReadはすでにtrueなので再度emitされないという仕組みです。イベントループが終了するとQScopedValueRollbackによりemittedReadyReadの値がfalseに戻され、再びemitされるようになります。
この仕様を実験するため以下のコードを書きました。
QLocalServer、QLocalSocketを使ってサーバ、クライアント間でUnix Domain Socketを介してデータを相互に送受信しています。
動作確認した環境はMac (Mavericks) , Qt 5.4です。
readyReadシグナルにconnectされたonReadyReadスロットの中でQEvnetLoopを作成、実行しています。
サーバ側のコード
Server.h
#pragma once

#include
#include
#include
#include
#include

class Result : public QObject {
  Q_OBJECT

  int m_result;

 public:
  int result() { return m_result; }
  void setResult(int result) {
    m_result = result;
    emit ready();
  }

signals:
  void ready();
};

class Server : public QObject {
  Q_OBJECT

  Result m_result1;
  Result m_result3;
  QLocalSocket* m_sock;

 public:
  void start() {
    QString sockPath = "/tmp/qeventloop_test";
    QLocalServer* server = new QLocalServer();
    QFile sockFile(sockPath);
    if (sockFile.exists()) {
      sockFile.remove();
    }
    server->listen(sockPath);
    connect(server, &QLocalServer::newConnection, [this, server]() {
      m_sock = server->nextPendingConnection();
      connect(m_sock, &QLocalSocket::disconnected, m_sock, &QLocalSocket::deleteLater);
      QObject::connect(
          m_sock, &QLocalSocket::readyRead, this, &Server::onReadyRead, Qt::QueuedConnection);

      sendData(m_sock, 1);

      QEventLoop loop;
      connect(&m_result1, &Result::ready, &loop, &QEventLoop::quit);
      qDebug("start event loop to wait for 1");
      loop.exec();
      qDebug("end event loop to wait for 1");
    });
  }

  void onReadyRead() {
    qDebug("bytesAvailable: %lld", m_sock->bytesAvailable());
    qint64 bytesAvailable = m_sock->bytesAvailable();
    QByteArray buffer = m_sock->readAll();
    QDataStream ds(buffer);
    while (bytesAvailable > 0) {
      int num;
      ds >> num;
      qDebug("received %d", num);
      bytesAvailable -= 4;
      if (num == 2) {
        sendData(m_sock, 3);

        QEventLoop loop;
        QObject::connect(&m_result3, &Result::ready, &loop, &QEventLoop::quit);
        qDebug("start event loop to wait for 3");
        loop.exec();
        qDebug("end event loop to wait for 3");

      } else if (num == -1) {
        m_result1.setResult(num);
      } else if (num == -3) {
        m_result3.setResult(num);
      }
    }
  }

  void sendData(QLocalSocket* sock, int num) {
    qDebug("send %d", num);
    QByteArray block;
    QDataStream ds(&block, QIODevice::WriteOnly);
    ds << num;
    sock->write(block);
  }
};
main.cpp
#include
#include
#include
#include "Server.h"

int main(int argv, char** args) {
  QApplication app(argv, args);

  Server server;
  server.start();

  return app.exec();
}
クライアント側のコード
main.cpp
#include
#include
#include

void sendData(QLocalSocket& sock, int num) {
  qDebug("send %d", num);
  QByteArray block;
  QDataStream ds(&block, QIODevice::WriteOnly);
  ds << num;
  sock.write(block);
}

int main(int argv, char** args) {
  QApplication app(argv, args);

  QLocalSocket sock;
  QObject::connect(&sock, &QLocalSocket::readyRead, [&sock]() {
    qint64 bytesAvailable = sock.bytesAvailable();
    QByteArray buffer = sock.readAll();
    QDataStream ds(buffer);
    while (bytesAvailable > 0) {
      int num;
      ds >> num;

      qDebug("received %d", num);
      bytesAvailable -= 4;

      if (num == 1) {
        sendData(sock, 2);
        sendData(sock, -1);
      } else if (num == 3) {
        sendData(sock, -3);
      }
    }
  });

  sock.connectToServer("/tmp/qeventloop_test");
  return app.exec();
}
実行結果は以下のようになります。
send 1
start event loop to wait for 1
bytesAvailable: 8
received 2
send 3
start event loop to wait for 3
bytesAvailable: 4
received -3
end event loop to wait for 3
received -1
end event loop to wait for 1
次にサーバ側プログラムの以下のQueuedConnectionとなっている箇所を
QObject::connect(m_sock, &QLocalSocket::readyRead, this, &Server::onReadyRead, Qt::QueuedConnection);以下のようにDirectConnection(デフォルトではsenderとreceiverが同一スレッドであればDirectConnectionとなります)を使うように変更してみます。
      QObject::connect(
          m_sock, &QLocalSocket::readyRead, this, &Server::onReadyRead);
実行結果は以下のようになります。クライアントが-3を送信してもサーバのQLocalSocketはreadyReadシグナルが呼び出されないので、以下のように永遠にイベントループが終了しません。
send 1
start event loop to wait for 1
bytesAvailable: 8
received 2
send 3
start event loop to wait for 3
QLocalSocket, QEventLoopを使う時はreadyReadシグナルの仕様に気をつけましょう!
日本からBank of Americaの口座を閉じる
昨年10月にアメリカから帰国したんですが、まだ一部ペンディングのトランザクションがあって帰国前にアメリカの口座を閉じれず、帰国後に閉じたんですがすごく時間がかかって大変でした。最初に電話で問い合わせてから小切手を受け取るまでに3ヶ月半かかりました。以下は簡単な流れです。今後同様のことを行う方の参考になれば幸いです。
10月頭
帰国
10月中旬
電話でCheckingとSavingsアカウントを閉じたいと伝える。残高は小切手(Cashier’s check)を送るから日本の住所を教えてくれと言われ教える。小切手は2週間くらいで届くとのこと。
11月上旬
2週間たっても小切手が届かないので再度電話で問い合わせ。前回の電話で閉じれたのだと思っていたらどうやらCheckingアカウントは残高がかなりあるため電話では受け付けできず、口座を閉じたいという旨の手紙を送れと言われる。
12月中旬
1か月後ようやく返信が来て小切手が届いたのかと思いきや、口座を閉じるなら所定のフォームに公証人のサインをして返信しろという旨の封書が届く。電話で問い合わせたところ日本の公証人でOKらしかったので、すぐに公証人にサインをもらって返信。
1月中旬
ようやく小切手が届いたので、UFJに外貨預金口座を開設して小切手の取り立てを依頼。入金までに3週間程かかるとのこと。
2月上旬
きっちり3週間後外貨預金口座に入金される。
入金まで約3ヶ月半かかりました。良い子のみんなは帰国前に口座を閉じるか、当面の生活費をワイヤートランスファーなどで帰国前に送金しておきましょう。。
Artistic License 2.0のソフトを自作アプリと一緒に配布するための条件
npmを現在開発中のエディタに埋め込んで一緒にバイナリを配布したいので、npmが使用しているArtistic License 2.0について調べてみました。
主にPerlで使われているようです。
http://ja.wikipedia.org/wiki/Artistic_License
原文
http://www.perlfoundation.org/artistic_license_2_0
埋め込む時のポイントは原文の以下の(7)と(8)です。
Aggregating or Linking the Package
(7) You may aggregate the Package (either the Standard Version or Modified Version) with other packages and Distribute the resulting aggregation provided that you do not charge a licensing fee for the Package. Distributor Fees are permitted, and licensing fees for other components in the aggregation are permitted. The terms of this license apply to the use and Distribution of the Standard or Modified Versions as included in the aggregation.
(8) You are permitted to link Modified and Standard Versions with other works, to embed the Package in a larger work of your own, or to build stand-alone binary or bytecode versions of applications that include the Package, and Distribute the result without restriction, provided the result does not expose a direct interface to the Package.
Aggregateする場合は商用ソフトにも含めることができ(ただしnpmはArtistic Licenseのまま)、Linkする場合はnpmへのdirect interfaceを提供しなければ商用ソフトにもリンクして配布できそうです。
direct interfaceとは何でしょう?Artistic Licenseの補足のSection 8に説明があります。
http://www.perlfoundation.org/artistic_2_0_notes
Section 8:
You’re totally free to embed Perl inside your software in a way that doesn’t allow users to access Perl. On the other hand, if you embed it and users can nevertheless do things like running Perl scripts, then you really are distributing Perl and need make sure that your distribution fits one of the use cases in (1)-(7).
ユーザが直接npmのプログラムを実行できたらそれはdirect interfaceと見なされるみたいです。
AggregateとLinkの違いは何でしょう?
GNU GPLのFAQにaggregateの説明があります。
http://www.gnu.org/licenses/gpl-faq.html#MereAggregation
What is the difference between an “aggregate” and other kinds of “modified versions”?
An “aggregate” consists of a number of separate programs, distributed together on the same CD-ROM or other media. The GPL permits you to create and distribute an aggregate, even when the licenses of the other software are non-free or GPL-incompatible. The only condition is that you cannot release the aggregate under a license that prohibits users from exercising rights that each program’s individual license would grant them.
Where’s the line between two separate programs, and one program with two parts? This is a legal question, which ultimately judges will decide. We believe that a proper criterion depends both on the mechanism of communication (exec, pipes, rpc, function calls within a shared address space, etc.) and the semantics of the communication (what kinds of information are interchanged).
If the modules are included in the same executable file, they are definitely combined in one program. If modules are designed to run linked together in a shared address space, that almost surely means combining them into one program.
By contrast, pipes, sockets and command-line arguments are communication mechanisms normally used between two separate programs. So when they are used for communication, the modules normally are separate programs. But if the semantics of the communication are intimate enough, exchanging complex internal data structures, that too could be a basis to consider the two parts as combined into a larger program.
直接npmを静的or動的リンクせず、パイプやソケットを使ってプロセス間通信を行えばaggregateと見なされるみたいです。
結論
つまりnpmとリンクさせずプロセス間通信を使えばnpmを商用エディタに含めて配布することが可能みたいです。その際npmのバイナリだけでなくライセンスファイルも一緒に含めないといけません。
Macで英語配列のRealforceを使う
環境
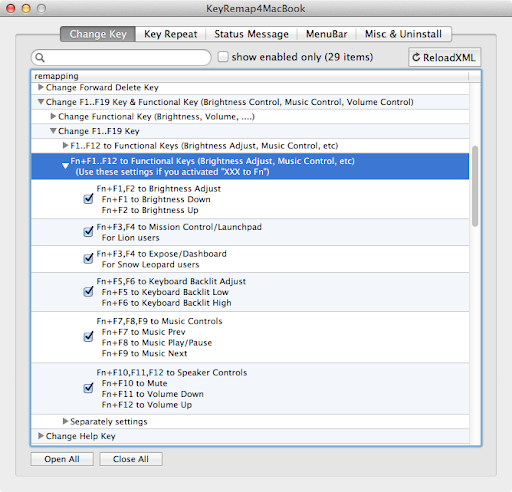
RealforceはWindows用キーボードなので、デフォルトではWinキーはCommand、AltキーはOptionに割り当てられたり等、Mac用のキーボードとかなりレイアウトが異なります。ここではKarabiner(旧KeyRemap4MacBook)、Seil(旧PCKeyboardHack)を使ってMac用キーボードのレイアウトに近づける方法を紹介します。
まずは以下2つのソフトをインストールして下さい。
- Karabiner
https://pqrs.org/osx/karabiner/index.html.ja
- Seil
https://pqrs.org/osx/karabiner/seil.html.ja
CtrlとCaps Lockの入れ替え
この変更は鉄板ですね。色々方法はありますが、僕はRealforceのDip Switch 1を使用しました(スイッチをONにすると入れ替え)。USBを一旦抜かないと有効にならないので注意。
Option、Commandキーの入れ替え
System Preferencesのキーボード設定でモディファイアキーを以下のように設定します。キーボード選択ボックスでRealforceを選択してから設定して下さい。Caps LockをNo Actionにするのは後でSeilを使ってCaps LockにFnキーを割り当てるためです。
- Caps Lock -> No Action
- Option -> Command
- Command -> Option
Caps LockをFnに
SeilでCaps Lockに未使用のキー(今回はF19を使用)を割り当てます。(Fnキーは63となっていますが、63ではFnキーとして動作しません) 
Karabinerのprivate.xmlを編集してF19をFnキーに割り当てます。private.xmlの読み込み方についてはhttps://pqrs.org/osx/karabiner/document.html.jaを参照して下さい。
<item>
  <name>F19 Key to Fn (Change CapsLock to F19(80) in Seil)name>
  <identifier>remap.f192fnidentifier>
  <autogen>__KeyToKey__ KeyCode::F19, KeyCode::FNautogen>
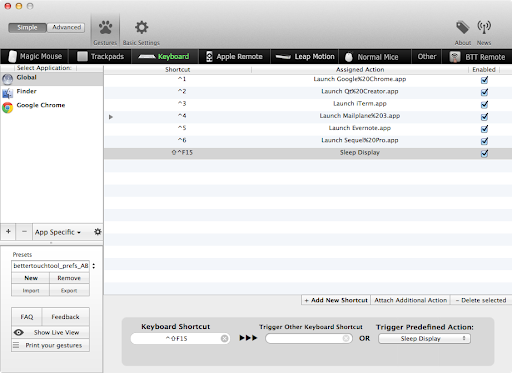
item>ディスプレイをスリープ(Ctrl+Shift+Eject)のショートカットを設定
この設定はBetterTouchToolを使って行います。
http://blog.boastr.net/downloads-secondbar-bettertouchtool-2/
ApplicationキーをOptionに割り当て
Karabinerのprivate.xmlに以下を追加。Realforceのキーボードのみで有効になるようにしています。
  <devicevendordef>
    <vendorname>TopreCorporationvendorname>
    <vendorid>0x853vendorid>
  devicevendordef>

  <item>
    <name>App to Optionname>
    <identifier>private.deviceproductdef.topre.app_to_optionidentifier>
    <device_only>DeviceVendor::TopreCorporationdevice_only>
    <autogen>--KeyToKey-- KeyCode::PC_APPLICATION, KeyCode::OPTION_Rautogen>
  item>
Home/Endキーの設定
private.xmlに以下を追加。
  <item>
    <name>Home/Endname>
    <identifier>private.deviceproductdef.topre.home_endidentifier>
    <device_only>DeviceVendor::TopreCorporationdevice_only>
    <autogen>--KeyToKey-- KeyCode::HOME, KeyCode::CURSOR_LEFT, VK_COMMANDautogen>
    <autogen>--KeyToKey-- KeyCode::END, KeyCode::CURSOR_RIGHT, VK_COMMANDautogen>
  item>
かな・英数の切り替え
Macでの日本語入力モードの切り替え方法は悩ましいですが、僕はワンショットモディファイアを使用しています。Shiftだけを押すとかな、Altだけを押すと英数に切り替わるようになっています。
<item>
  <name>When type Command_L only, send JIS_EISUU(except in Virtual Machine, RDC)name>
  <identifier>private.cmdL_only_to_eisuuidentifier>
  <not>VIRTUALMACHINE, REMOTEDESKTOPCONNECTIONnot>
  <autogen>--KeyOverlaidModifier--
    KeyCode::COMMAND_L, ModifierFlag::COMMAND_L | ModifierFlag::NONE,
    KeyCode::COMMAND_L, KeyCode::JIS_EISUU
  autogen>
item>

<item>
  <name>When type Shift_L only, send JIS_KANA(except in Virtual Machine, RDC)name>
  <identifier>private.shiftL_only_to_kanaidentifier>
  <not>VIRTUALMACHINE, REMOTEDESKTOPCONNECTIONnot>
  <autogen>--KeyOverlaidModifier--
    KeyCode::SHIFT_L, ModifierFlag::SHIFT_L | ModifierFlag::NONE,
    KeyCode::SHIFT_L, KeyCode::JIS_KANA
  autogen>
item>private.xmlのまとめ
ここまで紹介したprivate.xmlをまとめたものを以下に貼ります。
  <devicevendordef>
    <vendorname>TopreCorporationvendorname>
    <vendorid>0x853vendorid>
  devicevendordef>

  <item>
    <name>Topre Realforcename>

    <item>
      <name>F19 Key to Fn (Change CapsLock to F19(80) in Seil)name>
      <identifier>remap.f192fnidentifier>
      <autogen>__KeyToKey__ KeyCode::F19, KeyCode::FNautogen>
    item>

    <item>
      <name>App to Optionname>
      <identifier>private.deviceproductdef.topre.app_to_optionidentifier>
      <device_only>DeviceVendor::TopreCorporationdevice_only>
      <autogen>--KeyToKey-- KeyCode::PC_APPLICATION, KeyCode::OPTION_Rautogen>
    item>

    <item>
      <name>Home/Endname>
      <identifier>private.deviceproductdef.topre.home_endidentifier>
      <device_only>DeviceVendor::TopreCorporationdevice_only>
      <autogen>--KeyToKey-- KeyCode::HOME, KeyCode::CURSOR_LEFT, VK_COMMANDautogen>
      <autogen>--KeyToKey-- KeyCode::END, KeyCode::CURSOR_RIGHT, VK_COMMANDautogen>
    item>

    <item>
      <name>When type Command_L only, send JIS_EISUU(except in Virtual Machine, RDC)name>
      <identifier>private.cmdL_only_to_eisuuidentifier>
      <not>VIRTUALMACHINE, REMOTEDESKTOPCONNECTIONnot>
      <autogen>--KeyOverlaidModifier--
        KeyCode::COMMAND_L, ModifierFlag::COMMAND_L | ModifierFlag::NONE,
        KeyCode::COMMAND_L, KeyCode::JIS_EISUU
      autogen>
    item>

    <item>
      <name>When type Shift_L only, send JIS_KANA(except in Virtual Machine, RDC)name>
      <identifier>private.shiftL_only_to_kanaidentifier>
      <not>VIRTUALMACHINE, REMOTEDESKTOPCONNECTIONnot>
      <autogen>--KeyOverlaidModifier--
        KeyCode::SHIFT_L, ModifierFlag::SHIFT_L | ModifierFlag::NONE,
        KeyCode::SHIFT_L, KeyCode::JIS_KANA
      autogen>
    item>
  item>
Qt CreatorでCMake+Ninjaを使う (Mac)
環境
- Mac OS X Mountain Lion
- Qt 5.3
- cmake 3.0.1
qmakeからCMakeベースのプロジェクトに移行
まずはCMake, NinjaをHomebrewからインストール
brew install cmake ninjaqmakeベースのプロジェクトからCMakeベースのプロジェクトに移行するため、下記のようなCMakeLists.txtを作成。
cmake_minimum_required(VERSION 2.8.11)

project(hello)

# Find includes in corresponding build directories
set(CMAKE_INCLUDE_CURRENT_DIR ON)
# Instruct CMake to run moc automatically when needed.
set(CMAKE_AUTOMOC ON)
set(CMAKE_CXX_FLAGS "${CMAKE_CXX_FLAGS} -std=c++11")

set(hello_SOURCES main.cpp)

# Find the QtWidgets library
find_package(Qt5Widgets REQUIRED)

# Tell CMake to create the helloworld executable
add_executable(hello MACOSX_BUNDLE ${hello_SOURCES})

# Use the Widgets module from Qt 5.
target_link_libraries(hello Qt5::Widgets)
ちなみに下記のサイトを参考にした。
http://www.executionunit.com/blog/2014/01/22/moving-from-qmake-to-cmake/
コマンドラインでビルドしてみる
% cmake CMakeLists.txt -G Ninja
% ninja
エラーがなければhello.appが作成される。
Qt CreatorでCMakeのプロジェクトとしてオープンする
- Qt Creatorの設定でCMakeのパスを設定
- “Prefer Ninja generator”にチェックを入れる
- “File” -> “Open File or Project”でCMakeLists.txtを指定する
- 色々聞かれた後”Run CMake”をする時にGeneratorで”Ninja Generator”を選択して”Run CMake”をクリック
- 以下のようなエラーが出た場合、Qt CreatorがNinjaを認識していないので、代わりに”Unix Generator”を選択して”Run CMake”をする
- 上記ステップでエラーが出た場合、Projectの”Build Environment”のPATHにninjaへのパスが通っているか確認
- ビルドディレクトリ(xxx-build)を削除
- 再度”File” -> “Open File or Project”でCMakeLists.txtを指定し、”Run CMake”をする時にGeneratorで”Ninja Generator”を選択して”Run CMake”をクリックすると今度は成功する
CMake Error: Error required internal CMake variable not set, cmake may be not be built correctly.
Missing variable is:
CMAKE_C_COMPILER_ENV_VAR
CMake Error: Error required internal CMake variable not set, cmake may be not be built correctly.
Missing variable is:
CMAKE_C_COMPILER
CMake Error: Could not find cmake module file: /Users/shinichi/Code/untitled-build/CMakeFiles/3.0.1/CMakeCCompiler.cmake
CMake Error: Error required internal CMake variable not set, cmake may be not be built correctly.
Missing variable is:
CMAKE_CXX_COMPILER_ENV_VAR
CMake Error: Error required internal CMake variable not set, cmake may be not be built correctly.
Missing variable is:
CMAKE_CXX_COMPILER
CMake Error: Could not find cmake module file: /Users/shinichi/Code/untitled-build/CMakeFiles/3.0.1/CMakeCXXCompiler.cmake
CMake Error at CMakeLists.txt:1 (project):
  No CMAKE_C_COMPILER could be found.

  Tell CMake where to find the compiler by setting the CMake cache entry
  CMAKE_C_COMPILER to the full path to the compiler, or to the compiler name
  if it is in the PATH.


CMake Error at CMakeLists.txt:1 (project):
  No CMAKE_CXX_COMPILER could be found.

  Tell CMake where to find the compiler by setting the CMake cache entry
  CMAKE_CXX_COMPILER to the full path to the compiler, or to the compiler
  name if it is in the PATH.


CMake Error: CMake was unable to find a build program corresponding to "Ninja".  CMAKE_MAKE_PROGRAM is not set.  You probably need to select a different build tool.
-- Configuring incomplete, errors occurred!SBTでコンパイル完了後に通知する
普段Scalaで開発する時にはsbtのインクリメンタルコンパイルを使用するのですが、シングルディスプレイいっぱいにIntelliJを広げているといちいちターミナルを開いて確認しなければならないので、コンパイルが完了したら通知センターに通知を行う方法を考えました。
必要なもの
通知方法としてはGrowlをインストールするか、Macの通知センターを利用するかのどちらかとなります。
今回はMacの通知センターを使用しました。
Macの通知センターに手軽に通知を行うためにはAppleScriptかAutomatorのアクションが必要となりますが、なんとMountain Lionは通知センターがあるにも関わらず、デフォルトではAppleScriptやAutomatorのアクションをサポートしていないらしいです(Maverickだと対応しているみたいです)。
Mountain Lionはサードパーティのものを使う必要がありますが、幸い僕の使っているLaunchBarは通知センターに通知を行うAutomatorのアクションを持っているので、今回はこれを使用しました。
通知を行うAutomatorワークフローを作成
まずは通知センターに通知を行うAutomatorのワークフローを作成します。
message変数を引数に取って”Display in Notification Center”アクションに渡しているだけです。
作成したワークフローは以下に置いてあります。
SBTCompileFinishNotification.workflow.zip
作成したら /Applications ディレクトリにSBTCompileFinishNotification.workflowとして保存します。
iTerm 2のトリガーを設定
iTerm 2にはトリガーといってターミナルに出力される文字列がある正規表現にマッチした時に通知などのコマンドを実行したりする機能があります。
sbtのコンパイルが終わると以下の様な文字列が出力されます。
コンパイルエラー
[error] Total time: 2 s, completed 11/28/13 9:30 PM
コンパイル成功!
[success] Total time: 4 s, completed 11/28/13 9:31 PM
これらの文字列にマッチする正規表現とアクションを以下のようにトリガーとして設定します。
| Regular Expression | \\[(.*)\\] Total time: (\d+) s |
| Action | Run Command… |
| Parameters | automator -D message=”\1 \2 s” /Applications/SBTCompileFinishNotification.workflow |
HomebrewでMySQL 5.1をインストール (Mountain Lion)
インストール
以下のオプションを付けて色々試したがビルドエラーになってうまくインストールできなかった。
    $ brew install mysql51
    $ brew install --use-llvm mysql51
$ brew install --use-clang mysql51以下のようにAppleのgccを使ってコンパイルするとインストールできました。
    $ brew tap homebrew/dupes
    $ brew install apple-gcc42

    $ brew install --cc=gcc-4.2 --use-llvm mysql51
    or
    $ brew install --use-gcc mysql51
設定
インストール完了後の表示に従ってrootのパスワード等の設定を行います。
    $ unset TMPDIR
    $ cd /usr/local/Cellar/mysql51/5.1.71/bin
    $ ./mysql_install_db
必要なコマンド毎にsymlinkを作成
    $ sudo ln -s /usr/local/Cellar/mysql51/5.1.71/bin/mysql.server /usr/local/bin/mysql.server
    $ sudo ln -s /usr/local/Cellar/mysql51/5.1.71/bin/mysql /usr/local/bin/mysql
$ sudo ln -s /usr/local/Cellar/mysql51/5.1.71/bin/mysqldump /usr/local/bin/mysqldumpログイン時に自動起動するように設定
$ ln -sfv /usr/local/opt/mysql51/*.plist ~/Library/LaunchAgentsMySQLを今すぐ起動
$ launchctl load ~/Library/LaunchAgents/homebrew.mxcl.mysql51.plistor
$ mysql.server start設定ファイルは/etc/my.cnfをいじる。
以下のディレクトリにmy.cnfのサンプルファイル(my-medium.cnf, my-large.cnfなど)があるので、それらをベースに設定。
/usr/local/Cellar/mysql51/5.1.71/share/mysql設定を変更したらMySQLを再起動
$ mysql.server restart


